Staircase Gallery Wall: Following the Line of the Stairs
A step-by-step way to make pictures climb evenly beside the stairs: set one line parallel to the slope, choose a stepped row or a rising cluster, test it in paper and hang from the middle outward.
At a glance
- Difficulty
- Intermediate
- Time
- About 2 to 3 hours of planning, plus hanging
- Best for
- A wall beside a straight flight of stairs
- Renter note
- Planning needs no holes; hanging does. Check your lease or ask before making changes.
What you need
- Tape measure
- Pencil
- String
- Painter's tape
- Plain paper and scissors
- Level
- A helper
A stair wall is the one place in a home where the floor is not level, and that is exactly why pictures there so often look wrong. Line them up horizontally and they fight the slope. Step them up by guesswork and the line wobbles. A staircase gallery wall works when every piece relates to one thing: an imaginary line that runs parallel to the stairs.
Once that line exists, the rest is ordinary planning. You decide how the frames sit along it, test the arrangement in paper, and fix the pieces one at a time. The method below is in the order that saves the most climbing up and down.
The idea: a line parallel to the slope
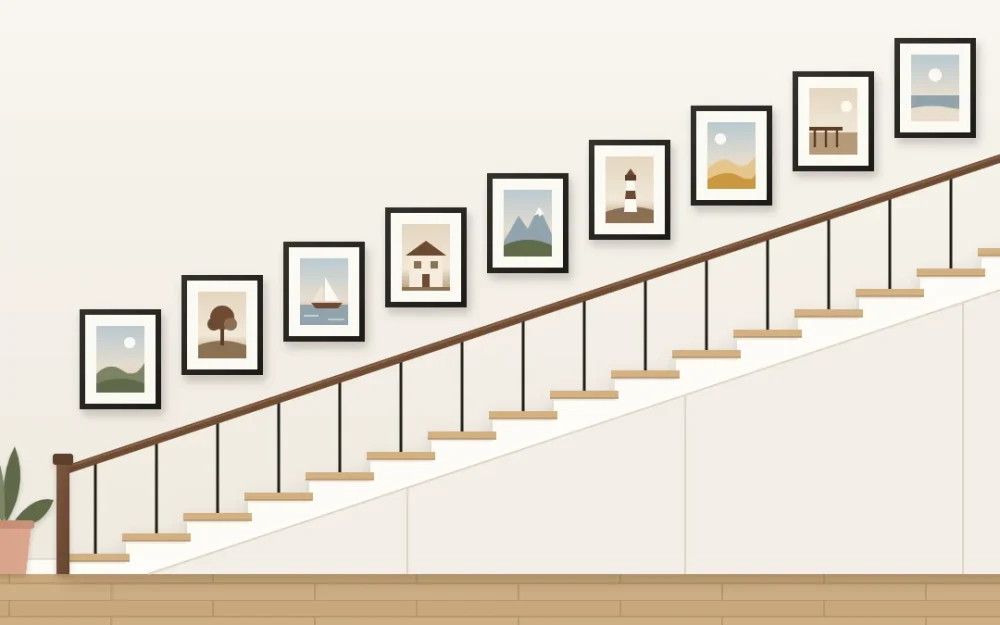
Picture a line drawn along the front edges of the steps, from the bottom tread to the top one. Now lift that line straight up the wall until it sits at a comfortable viewing height for someone walking the stairs. That raised line is the spine of the display.
Because it rises at the same angle as the stairs, a picture near the top is seen from the same relative height as a picture near the bottom. The handrail is a ready-made guide: it already follows the slope, so your line runs parallel to it, higher up.

Step 1: Decide the height of the line
Stand on a step in the middle of the flight and look at the wall beside you. The center of the display wants to be roughly where your eyes land without tilting your head. A common starting point is about 57 to 60 in (145 to 152 cm) measured straight up from the front edge of a step, but treat that as a first guess only.
The height that suits your stairs depends on the ceiling above the flight, the height of the handrail, the size of your frames and who uses the stairs most. A household with children may prefer the line a little lower. Tall frames may need it higher so their lower edges stay well clear of the rail.
Step 2: Mark the line on the wall
- Choose a step near the bottom and one near the top that you can reach comfortably while standing on the stairs.
- At each, measure the same distance straight up from the front edge of the step and make a light pencil mark.
- Join the two marks with a length of string held by a small piece of painter’s tape at each end, or with a run of tape itself.
- Go to the bottom of the stairs, then the top, and look. Raise or lower both ends by the same amount until the line feels comfortable.
Good to know
Paint finishes and surfaces vary, and tape can mark some of them. Test painter’s tape in a hidden spot first, and follow the tape manufacturer’s instructions for use and removal.
Step 3: Choose one of two arrangements
A stepped single row
Each frame is centered on the line, so the row climbs like a second handrail. This is the calmer option and the easier one to get right. It suits frames of the same size or two alternating sizes, and it is a natural fit for a family timeline, with the oldest pictures at the bottom and the newest at the top. The guide to choosing and grouping your own photos will help you edit that timeline down to the pictures that earn a place.
A cluster with a rising center line
Here the frames sit above and below the line in a looser band, but the middle of the band still follows the slope. Place your larger pieces on or near the line and let smaller ones step above and below. The outer edges of the band are then roughly parallel to the stairs too, which is what stops a cluster from looking like it is sliding downhill.
If you have never arranged a stepped wall before, start with the single row. It can grow into a band later by adding pieces above and below.
Step 4: Plan it in paper before fixing anything
A stair wall is a hard place to correct a mistake, so test the whole arrangement first. Cut a paper shape for each frame and tape the shapes along your line. The full method, including how to mark each hanging point on the paper, is in the guide to testing a layout with paper templates.
Keep the gap between neighboring frames consistent, measured along the slope. An even gap matters more than its exact size, and it is what makes the eye read the row as one line. Then walk the stairs both ways, several times, over a day. Check three things:
- Nothing sits where a shoulder, elbow or bag would brush it.
- Every lower edge is comfortably clear of the handrail, with room for a hand to slide along.
- The top and bottom pieces end at sensible points, not jammed against a ceiling, a door frame or the landing corner.
Step 5: Hang from the middle outward
Begin with the piece nearest the middle of the flight, then work up and down from it, checking each frame against the line and the gap. Each frame itself stays level, with its sides vertical. Only the row climbs.
Choose mounting hardware for your wall type and for the weight of each frame, and follow the hardware manufacturer’s instructions. On stairs it also helps to pick frames with a slim profile that sit flat against the wall, so nothing tilts forward into the walking space or gets knocked askew.
Before you hang anything
Working over stairs is awkward. Hang only what you can reach comfortably from a stable, level footing, and have a helper with you. Stairs are no place to improvise access. For the high sections of a stairwell, consider a professional installer who has equipment made for the job.
Where the stairs meet a landing or hall
At a landing the floor becomes level again, and so does the line. Let the last frame of the sloping row sit near the turn, then continue horizontally at a matching height. The change of direction looks deliberate when a slightly larger piece marks the corner.
If the stairs rise from a corridor, the level run can carry on along that wall as well. The article on arranging pictures in a narrow hallway covers the flat stretch, so the two displays feel like one.
Frequently asked questions
Should the frames on a stair wall be tilted to match the slope?
No. Each frame stays level, with its top and bottom edges horizontal, the same as on any other wall. Only the position of the frames changes: each one sits a little higher than the one before, so their centers follow a line that runs parallel to the stairs.
How many pictures does a staircase wall need?
It depends on the length of the flight and the size of the frames. A short flight can look complete with five pieces in a single stepped row, while a long one may take nine or more. Plan the row in paper first and stop when the ends sit comfortably short of the landing and the ceiling.
Can I use frames of different sizes on the stairs?
Yes. Center every frame on the same sloping line and keep the gaps between them even, and mixed sizes will still read as one row. Two alternating sizes look tidy. A wider variety suits a looser band, where larger pieces sit on the line and smaller ones step above and below it.