Hallway Gallery Wall: Layout Ideas for a Narrow Passage
Eight layout ideas for a hallway gallery wall, from a single row on one center line to a matching-frame band, with notes on slim frames, glare and light.
A hallway is the one place in a home where nobody stands back. People pass within arm’s reach of the wall, usually moving and often carrying something. That changes what a hallway gallery wall has to do: it is read up close and in sequence, a few frames at a time, more like turning pages than looking at one big picture.
So the arrangements that suit a wide living room wall rarely transfer. A passage rewards long, shallow displays, small pieces with detail worth a close look, and a clear line that carries the eye from one end to the other. The eight ideas below are built around that, and each one scales from a short landing to a long corridor.
1. Run a single row on one center line
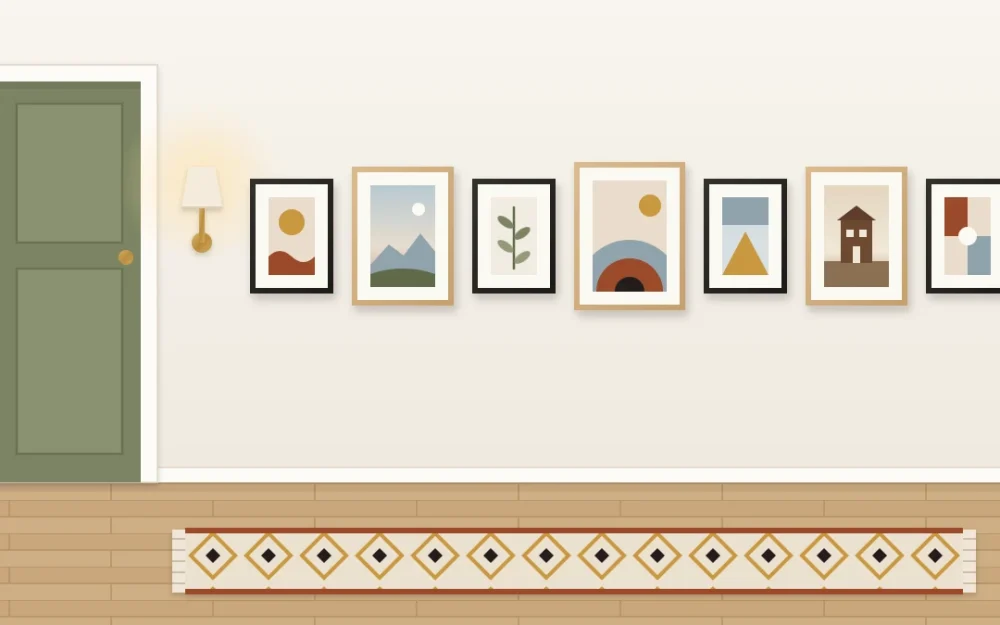
The simplest hallway layout is one row in which the middle of every frame sits on the same horizontal line. Tall and short frames can share the row because their centers agree, even though their tops and bottoms do not.
A common starting point is a center line roughly 57 to 60 in (145 to 152 cm) from the floor, which is a comfortable standing eye level for many adults. Treat it as a first guess. The height that suits your passage depends on who lives in the house, the ceiling height, the size of the frames and the door frames the row has to pass. Hold one frame against the wall, walk past it a few times and move it until looking at it takes no effort.
2. Fill a long band between two lines
If a single row feels too formal, picture two parallel lines, one above eye level and one below, and fit pieces of mixed sizes between them. Some frames stack in pairs, others stand alone, and the outline stays a long, even ribbon.
The band gives you the charm of a loose cluster without letting it sprawl. Keep the gaps between neighbors close to the same throughout, and the mix of sizes will read as one composition instead of a scatter.
3. Line up matching frames for order
A corridor with several doors, a radiator and a light switch already has a lot going on. A run of identical frames with identical gaps calms it down, because the eye registers one repeated shape and then moves to what is inside.
Two rows of the same frame make a strong band on a long, uninterrupted wall. Small errors show more when everything matches, so follow the method for planning neat rows and columns before you mark anything.
4. Choose small pieces that reward a close look
At arm’s length a very large picture cannot be taken in at once. Small and medium pieces suit the distance much better, especially ones with fine detail: a pencil sketch, a pressed fern, an old family snapshot, a child’s drawing, a hand-drawn map of a place you love.
Generous mats help here. They give small images room to breathe and keep the frame sizes consistent even when the pictures inside are not. A hallway is also a natural home for personal photographs, since people slow down for faces they know. For help choosing which ones belong together, see these ideas for displaying your own photos as a group.
5. Keep every piece flat and slim
Anything that projects from a hallway wall will meet a shoulder, a backpack or a laundry basket sooner or later. Favor thin frame profiles that sit tight to the wall, and save deep box frames and shelves for rooms with more elbow room.
- Check the narrowest point of the passage and keep the display clear of it.
- Leave space around door frames so an opening door or a hand reaching for the handle does not catch a corner.
- Where a frame can be fixed at two points instead of one, it is less likely to tilt each time someone brushes past.
Before you hang anything
Choose mounting hardware to suit your wall type and the weight of each frame, and follow the hardware manufacturer instructions. If a piece is large, glazed or awkward to lift, get help with it.
6. Give the display a clear start and end
A row that simply runs out looks unfinished. Decide where the display begins and where it stops, and tie both points to something in the architecture: the edge of a door frame, the middle of a wall section, the point where the corridor turns.
Leave a visible margin of bare wall at each end so the frames do not appear squeezed in. On a very long wall, two or three shorter groups with pauses between them are often easier to look at than one unbroken line. If the hallway ends in a blank wall, one piece hung there gives the whole walk a destination.
7. Use one side only in a very narrow passage
Frames on both walls of a tight hallway can make it feel like a tunnel, and they leave nowhere for the eye to rest. Pick one side and keep the other plain.
The better side is usually the one with fewer doors, or the one you face as you enter. If neither wall offers a long clear stretch, treat the short sections between doors as separate small displays, using these arrangements for narrow and awkward walls.
8. Manage glare and add gentle light
Hallways tend to have a ceiling light or a window directly opposite the wall, and glass reflects both. Before you commit, hold a glazed frame at the planned height and walk the length of the passage to see where the reflections fall.
If glare is a problem, non-glare glazing, unglazed pieces such as small canvases, or a slight shift along the wall can all help. To brighten a dim stretch, plug-in, battery or rechargeable picture lights are the simple options. Anything that connects to the building’s wiring is a job for a licensed electrician.
Tip
Test the display the way it will be seen. Walk the hallway in both directions at your normal pace, once in daylight and once with the lights on, before you settle on a height or an order.
Frequently asked questions
How high should pictures hang in a hallway?
There is no single answer. Many people begin with the middle of the frames at a comfortable standing eye level and adjust from there. The best height depends on who uses the hallway, the ceiling, the frame sizes and nearby door frames. Hold a frame in place and walk past it before deciding.
Should I put pictures on both sides of a narrow hallway?
In a very narrow passage, one side is usually enough. Frames on both walls can make the space feel tighter and give the eye no place to rest. Choose the wall with fewer doors or the one you face on entering, and leave the opposite wall plain or nearly plain.
What size frames work best in a hallway?
Small and medium frames tend to suit a hallway because they are viewed from very close. Pieces with fine detail and generous mats are easy to enjoy at that distance, while very large pictures are hard to take in. Slim frame profiles also keep the display out of the way of shoulders and bags.