How to Update a Gallery Wall Without Starting Over
Five levels of refresh for an existing gallery wall, from swapping art and mats to re-spacing the group and adding new frames at the edges with paper templates.
At a glance
- Difficulty
- Easy
- Time
- About 10 minutes for an art swap, up to an afternoon for a rearrangement
- Best for
- An existing gallery wall that feels dated, crowded or outgrown
- Renter note
- Swapping art and mats needs no new holes; moving or adding frames does. Check your lease or ask before making changes.
What you need
- Phone or camera
- Tape measure
- Plain paper and scissors
- Pencil
- Low-tack tape, tested first
- Level
- New art, mats or frames as needed
A gallery wall that felt right a few years ago can start to look dated, crowded or simply too small for the pieces you have gathered since. The instinct is to take everything down and begin again, but that is rarely needed. Most of what is on the wall is still doing its job.
It is easier to update a gallery wall in levels, starting with the change that disturbs the least and stopping as soon as the wall looks right again. The five levels below run from a ten-minute art swap to adding new frames around the existing ones.
Before you touch anything: photograph and diagnose
Take a straight-on picture of the whole wall, including the furniture below it. The picture is your record of where everything hangs, and it also shows the arrangement more objectively than your eye does after years of walking past.
Then name the problem in one sentence. “The art feels old” calls for a different fix than “it looks cramped” or “there is a gap on the left since the new lamp arrived.” If you cannot pin it down, compare your wall against this list of common gallery wall problems and their fixes. Knowing the fault tells you which level to begin at.
Level 1: swap the art and keep the frames
If the layout still pleases you and only the content has gone stale, leave every frame on its fixing and change what is inside two or three of them. Recent photographs, a child’s newer drawing, a pressed leaf or a print bought from its maker can shift the feel of the wall with no change to the arrangement.
Replace pieces spread across the group, not three neighbors, so the new material runs through the whole display. If you enjoy this kind of change, you can turn it into a habit with a few frames set aside for swapping art through the year.
Level 2: change the mats
Mats date a wall faster than most people expect. Yellowed, narrow or colored mats can make good art look tired, and replacing them is a modest job that leaves the frames and their positions untouched.
- Wider mats give small pictures more presence and make the wall feel calmer.
- One mat color across the group, such as a soft off-white, pulls unrelated pieces together.
Level 3: shift the frame palette
When the frames themselves are the problem, you do not have to replace all of them. Changing two or three is usually enough to move the palette, for instance from all dark frames toward a mix of dark and pale wood.
Repaint or replace the frames that look most out of step, and place the changed ones apart from each other so the new finish appears in several places. Each finish should show up at least twice, or the odd one out looks like an accident. The guide to combining different frames so they look collected covers how to choose which finishes go together.
Level 4: rework the arrangement
If the pieces are fine and the grouping is not, the frames have to move. Lay them on the floor in their current positions, using your picture as the guide, and try these three adjustments.
Re-space the group
Uneven or overly wide gaps are the most common reason an older wall looks scattered. Choose one gap and apply it throughout. Many arrangements settle somewhere around 2 to 3 in (5 to 8 cm) between frames, but treat that as a starting point: what suits your wall depends on the wall dimensions, the frame sizes and how much breathing room you like.
Remove a few pieces
A wall that has been added to over the years often needs fewer pieces. Take out the two or three weakest and close the group around the space they leave. The ones that remain will gain attention.
Move the anchor
The largest or boldest piece may have ended up at the edge as the group grew, or the furniture under it may have changed. Bring that piece back toward the middle of the display, or line it up with the center of the new furniture, and rebuild around it. If a new sofa or sideboard has altered the proportions of the whole wall, these living room placement ideas will help you relate the two again.
Level 5: add pieces at the edges
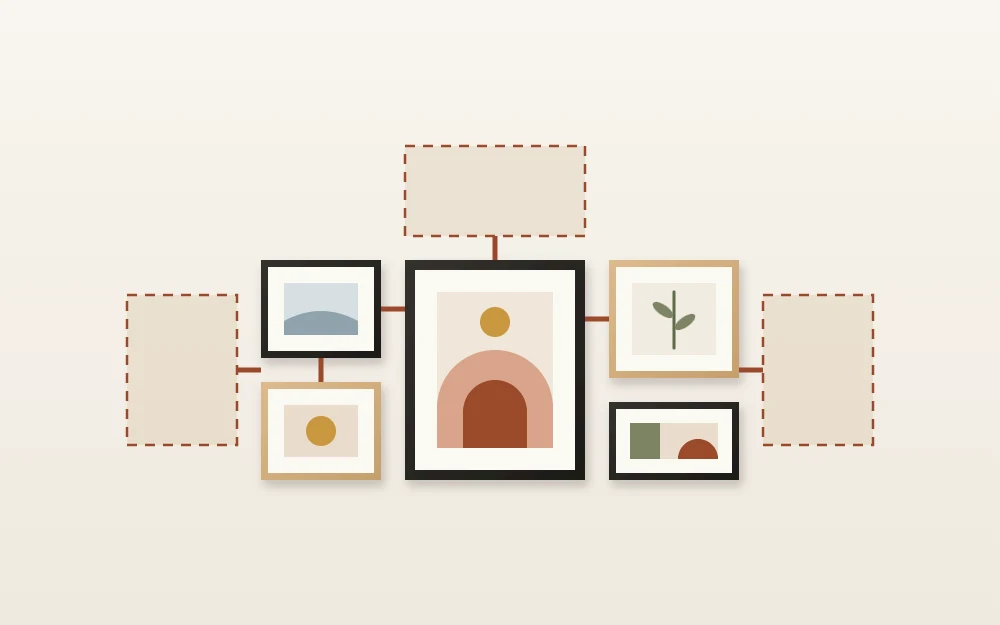
To grow an arrangement, extend it outward and let the existing frames set the pattern. Paper templates let you test the additions while everything else stays on the wall.
- Measure the gap between two existing frames. That gap is the one the new pieces should follow.
- Trace each new frame on plain paper and cut out the shape.
- Tape the papers to the wall around the outside of the group, keeping the measured gap between each paper and its nearest frame.
- Check the outline. The display should still form a tidy overall shape and stay centered on the furniture, so if you add to one side, consider adding to the other.
- Step back, leave the papers up for a day, adjust, and only then mark the fixing points.
Before you hang anything
Paint finishes and surfaces vary, so test your low-tack tape in a hidden spot first and follow the manufacturer instructions for use and removal. For the new frames, choose mounting hardware to suit your wall type and the weight of each piece, again following the manufacturer instructions, and get help with anything large or heavy.
What to do about old holes
Moving frames leaves marks behind. You have two general options. The first is to fill the holes with a suitable wall filler, smooth it once dry and touch up the paint. Be aware that touch-ups do not always blend, especially on older or sun-faded paint, so try a small area before doing the rest. In a rental, check your lease or ask before making changes.
The second is to plan the new arrangement so a frame covers each old mark. Note the positions of the holes when you take the frames down, and include them when you test the layout on the floor. Often a slightly larger piece, or one nudged a short distance, hides an old fixing point completely.
Tip
Stop at the first level that solves the problem. Take a second picture afterward and compare it with the first one; if the wall now looks right, there is no reason to go further.
Frequently asked questions
Can I add new frames to a gallery wall that is already hung?
Yes. Measure the gap between two existing frames, cut paper shapes the size of the new ones and tape them around the outside of the group at that same gap. Adjust until the overall outline looks balanced and still relates to the furniture, then mark the fixing points and hang.
What is the quickest way to refresh an old gallery wall?
Changing the art inside two or three frames is the fastest option, because nothing on the wall moves. Choose frames in different parts of the arrangement so the new images are spread out. New mats are the next step up and can make existing art look noticeably fresher.
How do I know whether to remove pieces or add more?
Look at a straight-on picture of the wall. If the frames nearly touch the corners, the ceiling or each other, removing a few will help. If the group looks small and lost above the furniture, adding pieces at the edges or one larger piece is more likely to fix it.